|
|
|
|
|
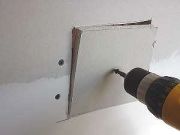
Step 5: Cut a piece of drywall to fit the hole. Secure the patch to the brace with one or more drywall screws. Again, drive the screw slightly below the surface of the patch. If possible, mount the patch so that it is slightly below the surrounding surface. |
|
|
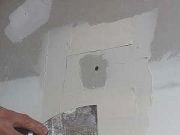
Step 6: Most professionals recommend that you tape around the perimeter of the patch. This keeps the joint compound from cracking when the wall moves. Apply compound around the perimeter of the patch and apply the tape around the edge. |
|
|
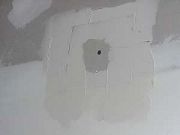
Step 7: Using a 4"-6" knife, firmly press the tape into the compound. Continue working the tape, squeezing the compound from underneath the tape. The tape should be free of wrinkles when you are done. Make sure that you also fill in over the screws. Let the compound dry overnight and gently sand it the next morning. Make sure you do not sand into the tape. |
|
|
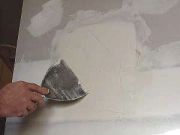
Step 8: Using a wide (6" or wider) knife, spread the joint compound over the tape and the patch. The area you cover should include several inches of undamaged wall. This is called "feathering" the compound and helps hide the repair. After the joint compound is dry, usually 24 hours, you need to sand the patch again. You should not sand the patch so much that the tape shows. Another coat of joint compound and another round of sanding may be required. |
|
|
|
|
|
|
|
|
|
Related articles
|
||||