Installing Floor Tile

Installing floor tile is a project that any dedicated do-it-yourselfer can accomplish.  Tile stands up to a lot of abuse as well as the cleaning necessary for kitchens, bathrooms and entry halls.

The only downside is that things that fall on floor tiles usually break.  This project describes how to install glazed, ceramic floor tiles.  More porous tiles like terra cotta may require additional steps.

To start with, you have to make a few design decisions:

The first one is to select the tile that appeals to you.  This is the part of the project that I can't help you with.  If you are as bad as I am at choosing colors it is a good idea to seek help.  One note: places like Home Depot normally have fairly plain tile.  If you want something unique, you will likely have to go to a tile store.

  The second decision is the color of the grout.  The coloring of the grout should complement the tile color.  If possible, go with a darker grout as stains are less likely to show.

The third design decision is the orientation of the tile.  Tile may be put down in any orientation but the most common are parallel to the wall or at a 45 degree angle to the wall.  Note that angled designs are harder to layout.

The fourth design decision is the space that you will allow between the tile.  Spacers are available from 1/16"  to 1/4".  Look at other floors to help determine what you like.  The width of the grout line will determine whether you need sanded or non-sanded grout.  Non-sanded grout should only be used when the grout will fill a gap 3/16" or smaller.  Sanded grout may also be used on 3/16" grout lines but nothing smaller.

Spreading grout on floor tile

Spreading grout on floor tile

Level of Difficulty

Time Required:
 8 hours
 
 
Tools:
Rubber float
Utility knife
Sponge
Sponge float
Notched trowel
Screw driver
Chalkline
Tape measure
Tile cutter
Materials:
Floor tile
Grout
Galnevized screws
Backerboard
Thinset or mastic
Self-leveling compound
Safety Precautions
Tile edges may be sharp.

Adhesive Choices

There are generally two types of adhesives used for setting tile: mastic and thinset.

Mastic

Mastic is basically glue for tiles.  The knock against mastic is that it is not tough enough for floors.  Mastic is not recommended for floors by most professionals.  Mastic cannot be used to set tiles on concrete or in wet areas.  It also cannot be used for floor tiles larger than six inches. However, mastic is easier to use and has a longer working time than thinset.  If you choose mastic, make sure that you get the type recommended for floors.

Thinset

Thinset is basically a modified cement and is the preferred adhesive for floor tiles.  Thinset adheres better and can carry more weight than mastic.  Thinset should have a latex additive which helps it resist cracking and adhere better.  Thinset is available with with the latex additive already mixed in or without.  If you get it without, you should purchase  liquid latex to add to the mix.  Follow the directions for mixing.

Applying mastic

Applying mastic


Applying thinset

Applying thinset


Preparing the Surface

Preparation is critical.  If you don't take your time during this phase you will be retiling sooner than you want.  In general, it is best to remove whatever floor is currently in place and start with the sub-floor.  The surface should be smooth, clean and level.  If there are holes or depressions in the subfloor they should be filled using a self-leveling compound.  For the most common floors, the following is recommended:

Ceramic Tile:
It is possible to tile over existing tile but not recommended.  One problem is the difference in height between the new floor and adjoining rooms.  If you decide to tile over existing tiles, sand the existing tiles with a coarse-grit sandpaper to increase adhesion between the adhesive and the new tiles.

Wood:
If you are tiling over a plank or strip floor, simply install cement backerboard over the floor.

Vinyl or Linoleum:
It is acceptable to tile over these surfaces.  Simply install cement backerboard over the existing floor.  If you elect to remove the flooring, make sure that it does not contain asbestos.  If you are unsure, call your local health department for instructions.  If the mastic will not come up with a scraper you might try a heat gun to soften it.  Just make sure that you have adequate ventilation as the mastic may contain some nasty chemicals.

Concrete:
Make sure that the floor is fully cured and level.  If the floor is not level you may have to use some self-leveling filler.

Final Clean-up

After the surface preparation is finalized, clean the floor with a damp sponge.  Make sure that you have plenty of clean water and rinse the sponge often.  This will help improve adhesion.

Self-leveling compound to fill hole

Self-leveling compound to fill hole


Remove vinyl tile

Remove vinyl tile


Sponge subflooring

Sponge subflooring


Installing the Base

The base is the substrate that the tile will be mounted on. It must be solid and stable.  Cement backerboard is considered the best choice but plywood is sometimes used instead.  Cement board has a cement core with fiberglass mesh on either side.  If you use plywood, use plywood that is made for sub-floors.  It is 3/4" thick and has a tongue and groove edge milled on it.  Both are installed in essentially the same way.

Plan your installation so that the joints between the cement backerboard (or plywood) do not line up with the joints in the subfloor and so that the joints in the backer board (plywood or cement) are staggered.  It is generally a good idea to cut your backerboard ahead of time and then dry fit the cut sections to make sure that the pieces fit and your joints are staggered.  If you do not know how to cut backerboard, click here.

Prepare your adhesive, if you are using thinset, mix it up according to the directions.  Construction adhesive requires no preparation. If you are using thinset, use a trowel or the smooth edge of the notched trowel, to spread your adhesive on the subfloor. Apply enough adhesive to secure one section of backerboard at a time.  After a sufficient amount of adhesive is on the floor, use the notched edge of the trowel to "raise" or "comb" the adhesive into smooth rows.

If you are using construction adhesive, lay out a decent bead around the perimeter and across the middle.  Check the tube for working times, it may cure faster than other adhesives.

Only lay down one sheet at a time, don't try cover the whole floor at once.  After you have the sheet down, screw it down using cement board screws (drywall screws work for plywood).  You should use one screw every 8 or so inches.  If you are using cement backerboard, stay at least an inch away from the edge or it may crumble.

If you are using cement backerboard, you must also tape the joints using a mesh tape and thinset.

Staggered joint lines for backerboard

Staggered joint lines for backerboard


Lay down backerboard

Lay down backerboard


Screws to hold down backerboard

Screws to hold down backerboard


Tile Layout

Orientation

Another task you must accomplish is to determine the layout of your tile.  The goal of tile layout is twofold:  identify problem areas and ensure that the tiles you must cut land on the edges.  Common problems are rooms that are out of square and walls that are not straight.  The most common layout tool is the 3-4-5 triangle.

The 3-4-5 shuffle

There are many ways to layout a floor.  Rooms with many obstructions may require more sophisticated methods than described here.  Professionals use a "floating" 3-4-5 triangle marked on the floor to adjust their layouts.  Fortunately, an easier way exists that provides excellent results.  Here's how:

1.  Using a measuring tape, mark the midpoint of two opposite walls.  Use a chalk line to snap a line between the two marks you just made.
2.  Measure the line you just snapped to find and mark the midpoint of the line.
3.  Using a carpenter's square, mark a perpendicular line from the midpoint of the original line.  Extend it as far as possible in both directions and use a chalk line to snap a line along it.
4.  What you have now is the middle of any room that has any kind of normal layout.  
5.  Use these lines to dry-fit your tiles (both directions) in place.  Your goal is to balance the cuts that you will have to make along opposite walls.  Based on what you find, you may have to adjust your layout line a few inches to balance the tiles along the walls.

Floor tile arrangement

Floor tile arrangement

Diagram of 3-4-5 rule

Diagram of 3-4-5 rule

Balancing cuts on both sides of centerline

Balancing cuts on both sides of centerline

Laying the Tile

Start in a corner or other convenient place. Remember to work towards a door so you can get out of the room!  The best way to do this is to lay the tiles along the lines you laid out before.  Using a trowel or the smooth side of the notched trowel, begin spreading your adhesive.  Lay out a bed about 1/8" thick over one of the squares that you laid out before.  After you have a sufficient amount of adhesive on the floor, use the notched side of the trowel to "comb" the adhesive into even rows.  Hold the trowel at a 50-70 degree angle when doing this. 

Place your first tile on the floor right along the layout line that you snapped earlier.  If you begin right along the wall, remember to leave a 1/4" gap between the tile and the wall.  Place the tile on the adhesive and then give it a slight twist to one side and then back again.  (It isn't a bad idea to pull up a tile every now and again to check that your method is working well.)  Next place a spacer on every corner that will adjoin another tile.  Put another tile down and push it tight against the spacers.  Repeat the process with more spacers and tile until you complete the square.

After you have completed an area, take a beater block (usually a piece of 2x4) and lightly tap on it with a rubber mallet to level the tiles.  This will also ensure that the tiles are firmly bedded in the adhesive.

After the tile sets up a bit, about 30 minutes, you should pull the spacers out from between the tile.  There is a special tool to do this but a small screwdriver and needle-nose pliers will also work.

Let the adhesive dry completely (check the adhesive instructions for drying times) before you walk on the tile.

Spread mastic on floor

Spread mastic on floor

Add spacer between tiles

Add spacer between tiles

Set in place with slight twisting motion

Set in place with slight twisting motion

Grouting the Tile

After the tile adhesive has had time to dry (usually overnight but check the package) it is time to grout the tile.  There are two types of grout: sanded and unsanded.  Sanded grout is used for joints 1/8" and wider.  Most floors have joints that are at least 1/8" but if your joints are narrower, use unsanded grout.

Grout is also available pre-mixed or dry.  Bulk grout is usually dry.  The dry mix is easy to blend, just follow the instructions.  The consistency should be between soupy and thick. It shouldn't run, nor should it be so thick that you can't force it into the joints (gaps).

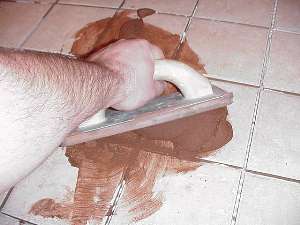
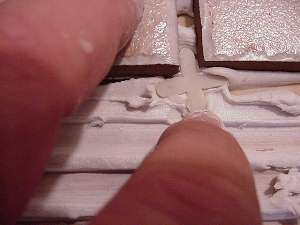
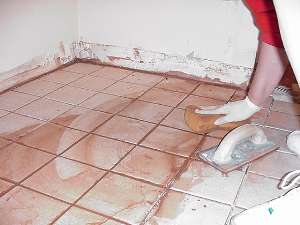
After the grout is ready to go, take your foam rubber float or other appropriate implement and scoop some grout out.  Place the grout on the floor and ,holding the rubber float at a 45 degree angle to the work piece, run the float parallel to the joints in the tile.  Round up the excess grout and run the float over the surface several times in order to fill in the joints.  When the joints are full, run the float over the surface at a 45 degree angle to the joints in order to level the joints and remove excess grout  This may require several passes.

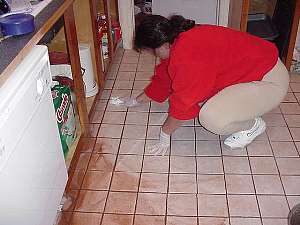
Cleaning Excess Grout

Cleaning the excess grout is normally a three-step process. Allow the tile to set up for 15-20 minutes, or until firm,  in the joints.  Using a damp sponge wipe any excess grout from the face of the tiles.  If you didn't get the grout in the joints right, this is the time you should do it.  Just make sure you wring as much water as possible from the the sponge.  Rinse out the sponge or rag often enough to keep it clean.

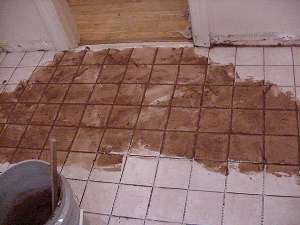
Allow the grout to dry another 45 minutes or until a haze forms on the tiles.  Use a rag (or the sponge) to clean the surface of the tiles again.  Be careful not to rub the grout from the joints.  If it seems like you just can't get the tile clean then let it dry a bit more.

After several hours you should use a clean towel to polish the tiles.

Curing and Sealing the Grout

For the next three days, before using a grout sealer, lightly mist the grout.  On the fourth day, use a grout sealer to ensure a good solid installation.  These sealers will keep the grout sealed from stains and water.

Spread grout over tiles

Spread grout over tiles


Sponge grout in

Sponge grout in


Clean remaining grout and polish tile

Clean remaining grout and polish tile