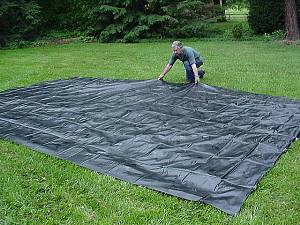
Installing a Lilly Pond

Lilly ponds are very popular.  They are a nice place to sit and reflect, especially if there is a water fall or raceway.  Nothing helps one settle down and think like a gentle waterfall.  You can already hear the gurgle of the water.

Now for a harsh bit of reality: installing a Lilly Pond is a lot of work.  Make sure you have plenty of help lined up to excavate your dream pond or you will get lots of what my Dad called "character building" exercise.

When planning your lilly pond make sure you set aside about $250 to get things rolling.  Expensive fish aren't necessary immediately but the liner and pump are.  It's a good idea to put the plants in about a week before you put any fish into the pond.

Lilly pond

Lilly pond

Level of Difficulty

Time Required:
 16 hours
 
 
Tools:
Shovel
Rake
Utility knife or scissors
Line level or level and board
Garden hose
Materials:
Pond liner
Pond pump and hose
Cap stone and rocks
Pond plants and fish
Filter (bucket and 1/2" PVC pipe)
Old carpet or liner
Safety Precautions
Besure that power is GFC protected.
Pond liner can be very slippery - Don't fall!

Layout and Preparations

The first thing to do is to layout your pond.  Take into account the available space and how much you want to spend on a liner.  Bigger liners are more expensive and bigger ponds require more labor to excavate.  Another consideration can be the surrounding terrain; if you are going to install a filter, it is sometimes best to place it on the high side of the pond.

  The easiest way to layout the pond is to take a garden hose and outline the shape of the pond that you want.  The more popular shapes resemble kidney beans or rectangles.  Some things to consider when laying out how your pond will look:

a In most areas of the country it is a good idea to make part of your pond at least 2' deep.  This helps to moderate the water temperature.

aIt is a good idea to put a 6" deep shelf around the outside of the pond in order to help conceal the liner.

aTry to pick a spot in your yard that is relatively level.

aA multi-tiered design: these are especially good as different plants sometimes need to be submerged at different levels.

aA sloping floor is also good.  Many ponds have most of the pond at 2' deep but part of it might step up to 18" or so.

Start by putting the point of the shovel just inside the hose and push the shovel in.  Move the shovel over a bit and keep going until you work your way around the entire perimeter of the pool.  From there, start digging from the middle out or the edge in.  An ax or mattock will come in handy to chop out the roots that you will inevitably encounter.

In our experience, it takes about 8-10 hours to dig a 5x10 pond, 2 feet deep.  It will take less time if you have help or particularly agreeable soil.

Interactive pond sizer provided by Little Giant

Layout hose for pond liner

Layout hose for pond liner


Dig perimeter of pond first

Dig perimeter of pond first


Level for shelf

Note the multi-tiered design in this picture.  This allows for a stone shelf around the outside as well as a "shelf" for plants.

Fine Tune the Excavation

When you think you are done, tamp down the soil in the bottom of the pond and any tiers that you may have excavated.  Next, put a board across the hole and measure down to the bottom to make sure that the bottom is relatively uniform.

The next step is to position a 2x4 (on edge) across the hole and place a level on it.  Check in all directions to make sure that the perimeter of the hole is level.  If the pond isn't level, use some of the dirt that you excavated earlier.  It is important that the rim of the pond be level or the water will fill the pond unevenly.

When the rim of the pond is level and the bottom is flat, it is time to check the sides and bottom of the pond for roots that are sticking out and small rocks.  Remember, roots *grow* so if you see any good-sized roots protruding, cut them back. 

Next you have to install a pad for the liner.  There are commercial pads available (some liners even have one attached) but if you don't want to spring for it, we've had good results with carpet.  Some manufacturers recommend sand but it is difficult to get sand to stick to the walls of the pond.  Newspaper or thinner cloth may be used but a low-nap indoor/outdoor carpet is what we use.  Line the bottom and sides of the hole with the carpet.  After you line the sides and bottom, make sure that you clean up any debris that has fallen from the sides of the pond.

Excavate shelf

Excavate shelf

Check level of tiers

Check level of tiers

Install old carpet as protective base

Install old carpet as protective base

Install the Liner

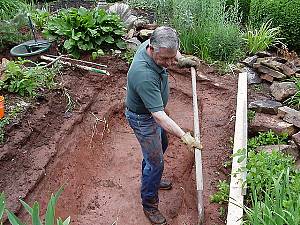
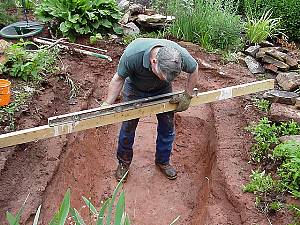
Once you have the hole properly excavated, layout the pond liner.  For this step, it is necessary to 
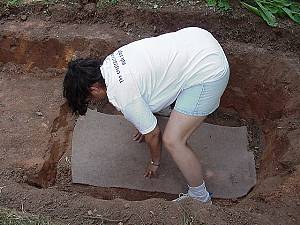
have someone help you get the liner into the hole without knocking all of the carpet from the walls of the pond.

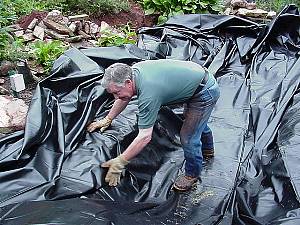
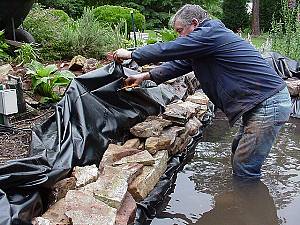
Position one person at each end of the liner, lift it up and place it in the hole.  Take off your shoes and get down into the hole.  Flatten out the liner as much as possible and carefully fold it so that it goes around the corners of the pond smoothly.  Alternatively, you can simply plop the liner into the hole, start filling it and wait for the water to flatten the liner.  We prefer to smooth the liner by hand.  This normally makes it easier to conceal the liner later.

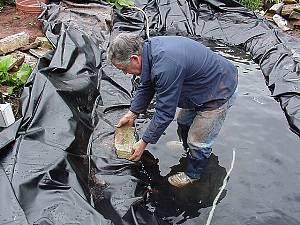
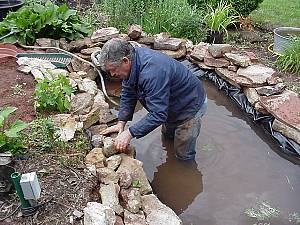
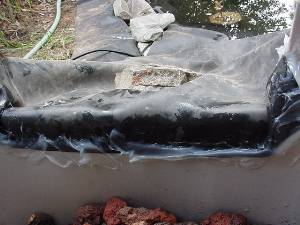
Regardless of the method that you use, once the liner is in the hole, fill the pond up about 1/4 of the way.  Carefully inspect the bottom of the pond for bumps.  If you see any, lift the liner (keeping the water on the inside) and remove the debris.  After everything on the bottom looks good, continue filling the pond and, from time to time, pull up on the edges of the liner to make sure that it settles into the corners.  As the water fills the pond, it will force the liner against the walls of the pond, continue to monitor the liner for bumps that show up and remove the offending object.

After the pond is filled with water, it is a good idea to go ahead and get into the water (it's cold!) and smooth the liner out.

After the liner is squared away, treat the water to remove the chlorine.  There are several commercial products available for this and they normally have instructions with them.  Let the water sit overnight.

Layout liner - Careful as this will kill the grass if left out in sun too long

Layout liner - Careful as this will kill the grass if left out in sun too long

Lay liner and smooth out for each shelf

Lay liner and smooth out for each shelf

Fill pond with water

Fill pond with water

Landscape and Finish Off

Once you have the pond filled with water and the liner is settled, you need to trim the liner.  Fold the liner over the lip of the pond and, using a pair of scissors,  trim around the edge of the pond.  You should leave some extra material around the edge, do not trim it too close.

Now it is time to landscape.  Regardless of whether you have a multi-tiered pond, stone is a favorite material for landscaping the pond and hiding the liner.  Start laying the stone around the perimeter.  If you are laying the stone on the liner at any point, use flat rocks and avoid placing sharp points against the liner.  Pile the rocks over the liner and make a short wall around the pond. 

It is a good idea to at this point to put pond plants into the pond and let them stabilize.  Wait about 5 days to put fish into the pond.

Stack rocks around shelf

Stack rocks around shelf

Continue with rocks until liner is covered and secure

Continue with rocks until liner is covered and secure

Trim excess liner with knife or scissors

Trim excess liner with knife or scissors

Pump and Filter

Pumps are an easy subject:  you need one to help circulate the water.  The best advice is to get a pump that is capable of "turning the water over" once an hour.  If your pond is 300 or so gallons, buy a 300 gallon per hour pump.  Approximate pond sizes are always on the pump box.  Pumps are usually used to pump the water through a waterfall, fountain, filter or some combination.  The waterfall or fountain is key as it injects more oxygen into the pond.

Filters are a bit more involved.  You can buy a sealed biological filter from the store for about $150 or you can build one for about $20.  It's easy.   You will need some 1/2" PVC piping, the necessary solvents to weld it, some hose clamps, silicone sealant, lava rocks, garden hose and a tub of some sort.  I used a rubbermaid tub but I've also used large plastic pots (terracotta lookalikes) to do the job.  The pot or tub can be installed on top of the ground and concealed or you can dig a hole and put it in the ground (but slightly above the level of the pond).  If you put the tub above ground, you can build a waterfall but you will have to mound dirt around it to help conceal it.  After you are finished, make sure you plant grass to hold the dirt in place.  If you dig a hole for it, you can simply have the water run back into the pond.  Decide which you are going to do now and place the tub.

Pond filter made of 1/2" PVC pipe

Pond filter made of 1/2" PVC pipe

Waterfall from filter

Waterfall from filter

Finish Filter and Enjoy!

Next, cut a notch in the container and using some dirt, build a ramp from the pond to the lip of the container.  Next, using silicone sealant, attach a leftover piece of pond liner to the lip of the container.  Let the pond liner run down the ramp and overhang the edge of the pond.  Let the silicone cure.

Next, build a "filter element" as pictured in the top right.  The shape doesn't matter, you can build a horseshoe or square shape.  It just has to fit inside of the bottom of the tub.  Leave the tube sticking above the top level of the tub so you can hook the hose up to it.   Next, get some lava rocks like you use in gas grill, wash them thoroughly and fill the container at least half full with them.  Hook the pump up to the filter element and turn it on and check for leaks.  Using small rocks, conceal the pond liner.

Now, you might experience an algae bloom in a couple of days, get a pond test kit and make sure the ph, nitrates, nitrites and other parameters are right.  Most likely the algae will go away.  As a last resort, you might use an algacide but this also attacks lillies and other pond plants.

Feed your lillies and plants and in no time you'll have a most enjoyable place.

Conceal the spillway from filter

Conceal the spillway from filter

Use ample amounts of silicon caulk to seal edge

Use ample amounts of silicon caulk to seal edge

Pond with landscaping and plants

Pond with landscaping and plants