Repairing Water-Damaged Tile Surrounds

Tile installations that are subjected to heavy use are liable, over time, to become loose and the wall behind the tile damaged.  If you do not stop and fix it now, the water will damage the framing behind the wall and that is a major headache.  The wall tiles near the faucet handles in this picture had started to come loose.  If I pushed on the wall, the section at the bottom would move.  I started to pry around with a screwdriver and one of the tiles popped off! 

Areas that are most prone to deterioration are around faucets and corners.  The majority of these installations are mounted on drywall or "green board." 

Fortunately, it is possible to remove just the damaged section and replace it.  The project takes about 6 hours (depending on damage) and is relatively inexpensive if you reuse existing tiles.

Damaged tile

Damaged tile

Level of Difficulty

Time Required:
 6 hours
 
 
Tools:
Pliers
Adjustable wrench
Rubber float
Utility knife
Screw driver
Materials:
Cement backerboard
Grout
Caulk
Safety Precautions
Follow ladder safety rules.

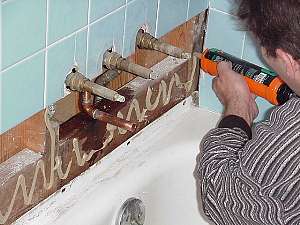
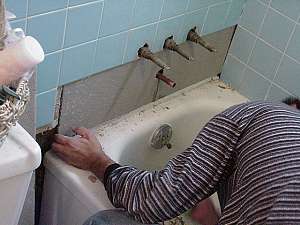
Remove Hardware and Loose Tiles

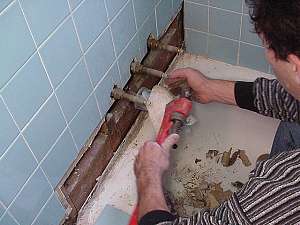
The first thing to do is to remove the hardware, if necessary.  Tub faucets usually have a screw to hold the handles on.  This screw is sometimes concealed behind a plate on the handle.  You may have to use a 
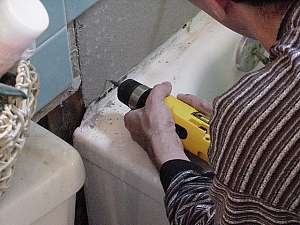
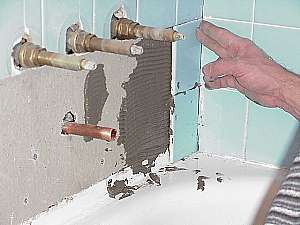
razor to pry the cover off.  Next, you have to remove the spigot.  First, inspect the spigot, if there is a hole on the bottom side with an allen-head screw in it, remove the screw and then the spigot.  If not, there is a threaded piece of copper (or, rarely, galvanized) pipe inside of the spigot.  Place a rag on the spigot (if you want to keep it) and use a pipe wrench to twist it off.  BE CAREFUL not to twist the copper pipe that the spigot is normally attached to.  If you do twist it, you will have to cut the elbow off and sweat a new piece on.  If you need help sweating pipe, click here.  If you are working in a tub or sink, you should plug the drain before you go any further so that the debris do not accumulate in the drain.
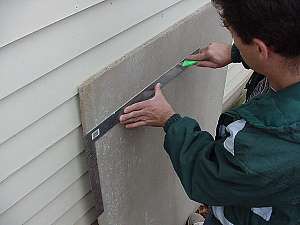
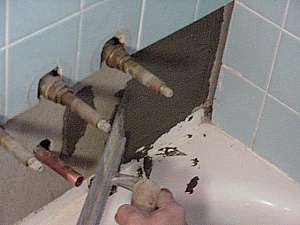
Remove Tile

Remove the loose tile.  You should remove whole courses so that you have straight lines to work with.  If you are planning to re-use the old tile, extra care must be taken to ensure that you do not break the tile.  Do not pry to heavily on the pieces as they will snap.

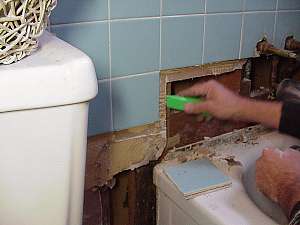
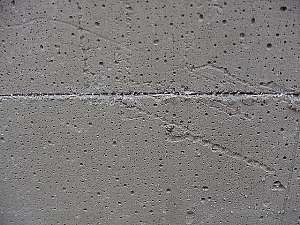
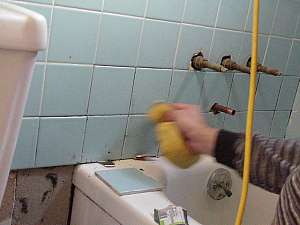
The grout can hold the tiles together and needs to be removed.  Using a razor knife, cut out as much grout as possible between the 
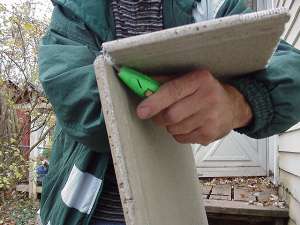
tiles.  Make several passes on each joint.  Next, work on the loosest tiles first.  You may have to lightly pry on the tiles to get them off.  Once you have the first tiles off, you can use a hand scraper to pry the tiles off.  Try to get the scraper as far behind the tiles as possible before you pry.  This will 
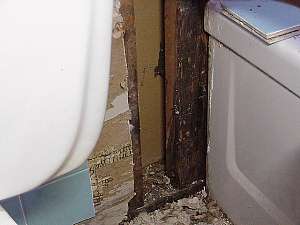
minimize the possibility of breaking the tiles.  You should remove tiles until you get to a course of tiles that are still firmly attached.  This usually the first course above the valves.  Tapping on the tiles can help you figure out which ones are in good shape.  Bad tiles will sound hollow, move or simply fall off the wall.

One other item, make sure that you note where the tiles came from.  If some of them are cut or notched you should make sure you keep track of where they go.

Remove handle screws

Remove handle screws


Remove spigot

Remove spigot


Remove tile grout

Remove tile grout

Cleaning up the Opening

After you have taken the necessary tile off the wall, you need to remove the damaged wall board.  Use a razor knife to score the wall board before you try to remove the board.  If you do not, you risk damaged the board behind the good tiles.  We recommend leaving a "lip" of good wall board so that you have an edge to match the new backerboard to (see the second picture).

Use a razor knife to score straight lines along the wall board.  Use your hand to snap the wall board and then use the razor knife to cut the paper on the back side of the wall board.

Now is the time to examine the framing behind the tiles.  If the boards are black, use a screwdriver to test the soundness of the lumber.  If the boards are rotted or soft, they need to be replaced.  This is a job that you can do yourself but you may want to call a professional to repair the framing.  In any event, it is beyond the scope of this article.

After you have straightened all of the cuts and removed the damaged wall board, use a small brush and vacuum to clean the area.  You do not want to grind the junk from the wall into the tub.  Also, the success of a new tile job depends heavily on cleanliness.  If the damaged area is damp, STOP HERE and let the area dry completely.  You want to start with a dry area.

Damaged tile

Rotted wallboard

Clean

Remove old wallboard

Damaged wood

Damaged wood

Cutting backboard

Next, you have to measure and cut  the new wall section.  The best choice is cement backerboard.  It is constructed from cement with a nylon mesh on either side.  It is strong and tolerates water very well.  There are many different brands (Durock, Miracle board) but the practical application seems to be the same.  So called "Green Board" is another choice.  This is drywall that has been treated to improve its water resistance.  Treated or not, it does not stand up to water like cement board does.  It is unadvisable to make the patch with "green" board.

Measuring and cutting Cement Board

Measure the opening that now exists.  Using a square, transfer these measurements to the cement board.  Cement board seems fairly tough but is actually fairly easy to cut.  There are two ways:

The first is to use a diamond wheel mounted on an angle grinder or other saw.  If you have these tools, they make cutting the cement board easier.  If you use this method, be aware that it creates quite a bit of dust and flying debris.  Wear appropriate safety equipment.

The second is to use a razor knife.  First you must cut the mesh on one side.  Score the cement board with a razor knife until you cut the mesh.  You will likely have to make several passes.  Second, snap the board away from you but do not allow the waste to hang free or it might pull the mesh from the other side.  Fold the snapped side over and, using you razor knife, cut the mesh on the other side.

Make sure that your cuts are as accurate as possible.  If you need to trim areas, you can simply run the knife along the edge.  Hold the knife so that the blade bites slightly into the edge.  This can be a tedious process so try to get it right the first time.

Score backerboard

Score backerboard

Close up of score in backerboard

Close up of score in backerboard

Back cut the backerboard

Back cut the backerboard

Installing Backerboard

Once you have the cement board cut to the correct dimensions, it is time to install it in the hole.

Put the cement board in the hole you have created.  It should be tight but fit in without breaking up the corners.  Do not force it.  If it does not fit in easily, take it back out and trim it.

Place the cement board back in the hole and check to make sure that it aligns with the existing wall.  If it is too low, you may have to shim the board out to the proper level.  You can do this with traditional shims (wedge-shaped pieces of wood) or by cutting slim "furring strips" and nailing them to the studs.

When you have the cement board cut to size, remove it from the hole and apply some construction adhesive to the exposed framing members.  This is simply some insurance to make sure that everything holds together tight.

Put the cement board in place and secure it to the wall with screws.  There are special screws that you should use for this.  They have a fairly coarse thread and are galvanized.  They should be available wherever you obtained the cement board.  If you can not find the special screws, just make sure that whatever you use is galvanized.

One note about installation.  If you have to use several pieces of cement board to fill in the holes, there is no need to worry about the small gaps yet.  We'll fill them in with thinset mortar in the following steps.

Liquid nails

Apply adhesive

Fitting in the backerboard

Fitting in the backerboard

Screw in backerboard

Screw in backerboard

Applying Adhesive and Tile

The next step is to apply the adhesive and set the tile.  Thinset mortar is really the only choice you have for showers.  Tile mastic is generally not recommended for showers and other areas regularly exposed to water.

Mix up the thinset in a disposable bucket.  The thinset should have a "latex modifier" included.  Some thinset is available with this already in the mix.  Some brands do not include it and you have to add it.  It is available in liquid form, check the directions on the containers.

Apply the thinset to the wall.  You should use a 3/8" notched trowel to apply the thinset to the cement board.  Make sure that you apply it in even rows.  If the area that you are repairing is especially tight, you may need to "backbutter" the tile.  In order to backbutter the tile, spread some thinset on the back of the tile and then use your notched trowel to spread the thinset out evenly.  You can backbutter all of the tiles if you need to but it takes a lot more time.

Next, begin replacing the tiles on the wall.  You can use spacers if you need to but for small areas they really are not necessary.  If you are working on the course of tiles at the bottom, you should shim them up a bit so that you create a joint that the grout can get into and seal.  Wipe any thinset from the face of the tiles before it sets up.  You should also scrape any thinset from the joints so that the grout has a gap to get into.  Let the thinset dry completely before you continue.

Spread thinset mortar

Spread thinset mortar

Spread on back of tile

Spread on back of tile

Set tile in place

Set tile in place

Grouting the Tile

You should probably use an unsanded grout for the tile.  The grout lines in most showers are thin enough (up to 1/8") for this grout.

Mix up the grout in a disposable bucket.  Follow the directions on the package.  The final consistency of the grout should be smooth and "sticky."  If you take some grout up with a trowel, it should be a couple seconds before any falls off.

Put some grout on your grout float and start spreading it on the wall.  During this phase, the idea is to fill all of the joints with grout.  Run the float parallel with the joints and force the grout into any gaps.  Make sure that they are all full!

Next, run your grout float at a 45 degree angle to the joints in order to scrape off the excess grout.  Try not to pull too much grout from the joints but get as much excess off as possible.

Take your sponge and wipe the grout from the face of the tile and smooth the grout in the joints.  Do not wipe too hard on the joints or you will pull the grout from the joints.  Clean your sponge often.  Make sure you use a bucket of water, not a sink.

After an hour or two, a haze will begin to form on the tile.  Using a rag or paper towel, polish this haze off.  Make sure you do not hit the joints as the grout is still soft.  Let everything dry about a day.

After 3 or 4 days it is a good idea to seal your new grout.  Water-based silicone sealers are available that provide good results.  Follow the directions on the container.

Smooth grout consistency

Smooth grout consistency

Using float to spread grout

Using float to spread grout

Using sponge to remove excess grout

Using sponge to remove excess grout