|
|
|
Replacing a Kitchen Faucet |
|
Kitchen faucets take as much abuse as any other part of the kitchen. They are called upon to do many things and with the increasing sophistication of these devices, upgrades are very attractive. Some faucets come with filters built in and some come with detachable "heads". All at a reasonable price. One note, there are several configurations for the feeder lines that may be present (copper or flexible) and it is advisable to at least look under the sink before heading off to buy your new sink so that you can pick up the necessary parts. Here's how to swap out that old beater with a new one. |
 |
|
Items needed:
Wrenches (open end and pipe)
Pipe dope (depends) Tubing cutter (optional) |
Safety Suggestions and Tips
Check plumbing codes ahead of time
Put rags or an old sheet on the cabinet floor |
Level of difficulty

Time Required: 1 Hour
|
|
|
|
Steps |
|
|
|
|
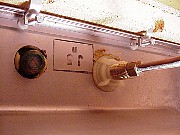
Step 1: Turn off the water to the old faucet. There are generally two valves underneath the sink. It is now necessary to remove the feeder lines that go from the valves to the sink. These may be either flexible plastic, braided metal or copper. |
|
Step 2: Normally, there are two plastic or metal nuts holding the faucet in place, these must be removed. Some faucets use variations where only one nut and a "horse shoe" are used but the most common are plastic. They may be tight and a wrench or pliers may be necessary to get them loose. |
|
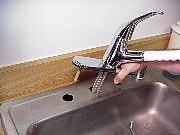
Step 3: Gently pull out the old faucet. If it has been there awhile, some amount of persuasion may be necessary but be careful not to damage the surrounding fixture. Take the lines from the new faucet and carefully feed them through the hole(s) and seat the faucet. At this point, you need to check the directions. Most faucets come with a gasket to establish the seal with the sink. If not, you may need plumbers putty to make the seal. |
|
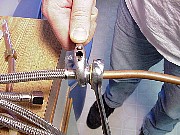
Step 4: Now you need to make the connections under the sink. If you had flexible connectors before, simply attach them to the ends of the lines coming from the sink. If you had copper feeder lines and decided to stay with them, you may need to cut them to an appropriate length. A compression fitting will likely be necessary. When tightening a compression fitting, try to use two wrenches so that the and tube do not spin inside of the fitting. |
|
|
|
|
|
|
|
Related articles
|
||||