|
|
|
Using Shellac |
|
One of the few "classic" finishes still in use today is shellac. Shellac is unique among finishes as the raw product is manufactured by a beetle in Asia and India. The Lac beetle produces this resin as a protective coating for its body. Among men, shellac is a versatile finish that is used to finish and/or seal woodwork and furniture. Shellac may be used to prevent "blotching" when staining softer woods or as a beautiful finish in its own right. Most modern shellac is "de-waxed" and will tolerate water fairly well. Alcohol will damage all shellac finishes as it is the solvent used in shellac. |
 |
|
Items needed:
Depends
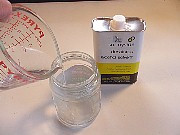
Shellac flakes or Pre-mixed shellac Denatured alcohol Brush or rag Glass container 320 grit sandpaper Measuring cup |
Safety Suggestions and Tips
Wear safety glasses
Alcohol is a solvent. Follow directions for handling. There are many colors of shellac, ranging from "Super blonde" which has almost no color to "Amber" which has a nice warm hue. |
Level of difficulty
 Time Required: 45 Minutes
|
|
|
|
Steps |
|
|
|
|
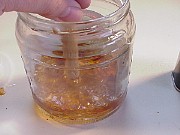
Step 1: Decide whether pre-mixed shellac or shellac flakes are to be used. Due to the limited shelf life of shellac, most professionals like mixing shellac for each job (less waste). Shellac made from raw flakes has a shelf-life of approximately 6 months before it becomes a gummy mess. The manufacturers of pre-mixed shellac claim a shelf life of 3 years. If you decide to mix up your own shellac, do *not* forget to strain it with a coffee filter before using it. |
|
Step 2: The next step is to decide what concentration or "cut" of shellac is necessary for the application. Undercoating and sealing applications require a "spit-coat" or 1/2# (pound) "cut" of shellac (pounds of shellac dissolved in a gallon of alcohol). Proper finishes require higher "cuts" (more shellac flakes) of finish. The basic formula for a 1# (one pound) cut of shellac is 4 oz. of flakes in a quart of alcohol. When using shellac flakes, dissolve the required amount of flakes in alcohol by mashing the flakes up and stirring them into solution. For pre-mixed shellac, adjust the concentration by checking the package and adding more solvent to the solution. |
|
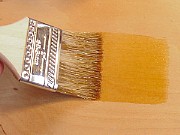
Step 3: Shellac may be brushed or "padded" on with a rag. The first step in any application is to apply a spit-coat to seal the surface. Wait for this to dry (normally 30 minutes or so) and lightly sand to remove burrs and smooth any raised grain. This is normally done with 220-320 grit sand paper. If you are simply sealing the surface for staining, this is the last step. If not, the following layers generally use more shellac (1-3 pound cut). Remember, many thin layers of finish always work better than one thick layer. |
|
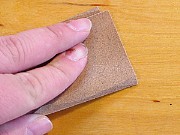
Step 4: The last layer of finish should be a 2 or 3 pound cut. After the finish is dry, sand it with at least a 320 grit sandpaper. Higher grits produce a more finished, reflective surface. When sanding shellac finishes with such fine sandpaper, it is often necessary to lubricate the sandpaper with mineral oil. This keeps the sandpaper from clogging and becoming useless after just a few passes. |
|
|
|
|
Related articles
|
||||