|
Cutting the Pieces
The first thing to do is to position the the
bottom (sole) plate. Place the sole plate on the floor where you want the wall
to be and then cut it to length. If you are using a circular saw, make sure
that you use a square to extend your mark across the board so that you cut
straight. Cut the top plate to the same length. Measure from a wall across the
room to both ends of the sole plate to make sure that the new wall is parallel
to the existing wall. Mark the position of the plate on the floor. Mark both
sides (it is easier to make a mark on both sides at either end and snap a chalk
line). Do not nail the sole plate in place yet.
The second thing to do is to position the top
plate. Using the measurement you made on the floor, measure from the opposite
wall and mark the location of the top stud. It is easiest to mark both ends and
snap a line in between with a chalk line. Measure over 2 1/2 inches and snap
another line, this is the outline of the top plate.
Now we have to figure out how to attach the new
wall to the existing framing. The first thing to examine is the ceiling. Find
out where the joists are by drilling holes through the area that you previously
marked on the ceiling (this way the new plate will cover the damage). There are
three possible scenarios:
1. (good) The new wall is parallel to the
ceiling joists and is also located directly underneath a joist. This will allow
you to nail directly to the joist.
2. (good) The wall is perpendicular to the
ceiling joists. The top plate can be fixed to the joists by nailing the plate
to the joists where they intersect.
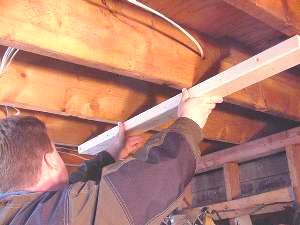
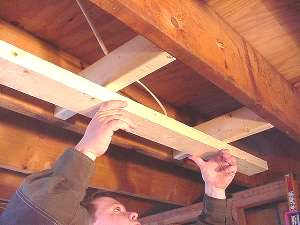
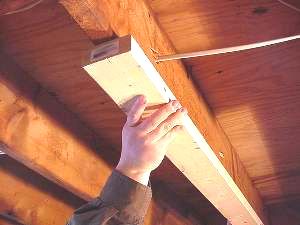
3. (pain in the neck) The wall is parallel to
the joists, but is not underneath one. The new wall should be fixed to something
solid. This scenario requires that you either relocate the wall or install
blocking between the joists so that you have something to nail to. If you have
access to the area above and the wall can not be relocated, here is how to
install blocking. Measure the distance between the joists, cut 2x4's to fit and
nail them into place, flush with the bottom of the joists. Use 16d nails for
this. You should put a block every 16"-24". Use a regular interval to make
your life easy.
|
|